top of page

High Resolution Maps (HiRISE and CTX)

This page contains directions for displaying Mars with high resolution. There are two cameras discussed on this page, HiRISE and CTX. HiRISE has higher resolution but, it is tricker to use and has much less Mars coverage. 

The CTX 

The default JMARS layer, Explore Mars automatically displays the CTX data when zoomed in to 2048 ppd (as of 4/2023). If the Explore Mars layer is not used, here are the steps to show them.

The CTX camera has a spatial resolution of about 6 meters per pixel. You can distinguish an object about the size of a car in a CTX image. It gathers light in the visible wavelengths.  https://mars.nasa.gov/mro/mission/instruments/ctx/​

​

  1. Open JMARS.

  2. IMPORTANT: Zoom in to your area of interest, to limit data downloads.

  3. Click on “layers”.

  4. Click the "Browse" menu choice.

  5. Under "Select Category", choose “Instrument”.

  6. In the "Subcategory" box choose "CTX", choose “CTX Stamps”.

  7. In the new pop-up window, choose “SET LON/LAT TO BOUNDS OF VIEW”. Click OK.

  8. Close “Add New Layer”.

  9. Either click on one outline or, click, hold and drag to make a small rectangle to select the stamps in your area of interest. Chosen stamps are outlined in yellow. Hint: the fewer stamps selected the quicker images load.

  10. Right Click in area of interest, Choose "Render Selected Projected_CTX Stamps" Click the orange side label.

  11. Wait… Wait time depends on your computer set up and how much data you selected. You will not be able to click on anything until this process is completed. You can then zoom in up to ~8192 pixels/degree zoom. Each zoom or may take several minutes to show. Check out the relatively new crater: Tooting !

HiRISE

The HiRISE camera has a spatial resolution of about 0.3 meters. You could distinguish an object about the size of a basketball in a HiRISE image. The 3 filters gather light in the blue-green, red and near infrared wavelengths.

https://mars.nasa.gov/mro/mission/instruments/hirise/  


NOTE: Since not all of Mars surface has HiRISE

coverage and to ensure that your area of interest

has HiRISE data you can go to these links to

browse HiRISE data locations first so you can

choose a location with data.

https://www.uahirise.org/hiwish/browse or 

http://global-data.mars.asu.edu/bin/hirise.pl 

HiRISE stamps

​​These steps are the same as for the CTXdirections above except for HiRise.

  1. Open JMARS

  2. Zoom in to your area of interest, to limit data downloads.

  3. Click on “layers”.

  4. Click the "Browse" menu choice.

  5. Under "Select Category", click “Instrument”.

  6. In the "Subcategory" box click "HiRISE", click “HiRISE Stamps”.

  7. In the new pop-up window, click “SET LON/LAT TO BOUNDS OF VIEW”. Click OK.

  8. Close “Add New Layer”.

  9. Click, hold and drag to make a small rectangle to select the stamps in your area of interest. Chosen stamps are outlined in yellow. Hint: the fewer stamps selected the quicker images load.

  10. Right click on one of the yellow outlines. Click "Render Selected HiRise_Full Stamps" Click the side orange label.

  11. Wait… Wait. You will not be able to click on anything until this process is completed. You can then zoom in up to ~131072 pixels/degree zoom. Each zoom or may take several minutes to show.

  12. Option: Right click, choose View "HiRise_Full Stamps", Slide curser to top list stamp, Choose "Web browse MSFF data page for ... A new window will open with just that stamp and stamp information. You can zoom in on map. Note about downloading: merged RGB jpeg are reasonably sized. JPEG2000 are HUGE files. 

Belva Crater with sand dunes

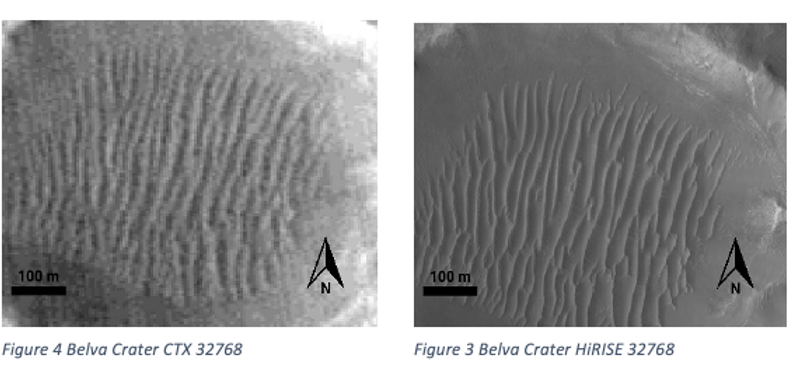
The following images illustrate the resolution difference between the  CTX and HiRISE resolution forthe small Belva Crater in the Jezero Crater delta

​

​

​

​

​

​

​

​

​

​

​

​

​

​

​

​

​

​

​

​

​


​

difference between resolution values
bottom of page